Friday, June 6, 2014

It's time for a scrapling!

SECOND POST TODAY!  First post was VERY early and this post is going live at 9:00 p.m.

When I saw Virginia's post for a scrapling challenge, I knew I had to make one, it's been too long.  Meet me at Virginia's View Challenge for a stroll down Scrapling Lane at the corner of Tag Court.  You'll have to bring a piece or two of junk or something that might be thrown out too.

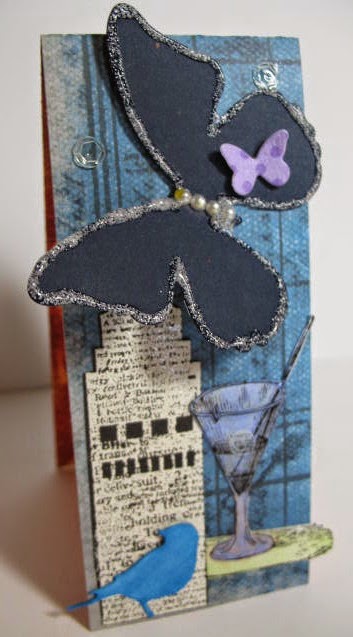
I was cutting easel cards out of a 12 inch X 12 inch card stock (that great denim blue background).  The leftover is cut approximately 1 1/2 x 4 1/4 inches.  I found a number of things in my plastic bag under my table (yes, into this bag go things I can't use right away, but that may be used).  I only colored the bird and the drink images.  The drink has some Glossy Accents dabbed where the drink is filled.  I rather like this - I think its the colors.

Hero Arts Skyline - one of the buildings cut out K5736
Hero Arts Digital image from Digital Design Kit "The Art of Style" - drink
Memory Box Darla Butterfly pulled out of package
Small Impression Obsession butterfly still on table
Memory Box Gold Finch die cut still on table

DT Roll Call over at Die Cut DIvas

There's a DT Roll call at Die Cut Divas and all the information is on this post.  We'd love to share some of your work with all the Divas out there.  Please stop in and consider sending the Die Cut Divas an email over on the Die Cut Divas' blog.

Thursday, June 5, 2014

A Crocus for You

Only one card today.  I didn't want to overwhelm you.  It's a card from my classes on May 31st with Els of Elizabeth Crafts.  We had all seats filled at The Stamp Art Shoppe and everyone was excited and busy.  I don't want to bore you with information, but the crocuses are painted with Copic markers over Elizabeth Crafts Microfine Glitter in Warm Diamond.  This is another great die too.

I found a great YouTube video with El's showing how to take the sticker from beginning to end.  She explains it so easily and you can see what she is doing, which helps a lot.  I won't be trying to photograph putting a card together because the video is fantastic.  .


Close-up of the front of the card.

This card is pushed back together so you can see the images better.

This is the inside the way it is meant to be opened.

The panel is easier to see in the close-up with it in the position it is die-cut in.

You can use this die-cut with any size card. It is easy to work with.  Even I could figure it out.

Monday, June 2, 2014

Elizabeth Crafts - I MET the REAL Els

On May 31st, I was lucky enough to take two classes from Els of Elizabeth Crafts.  She's just as charming and full of information and tips as you see on YouTube.  Oh my goodness, what you learn in one of her classes is incredible, well worth the effort to sign up for a class and attend.
This little owl is a sticker.  It would take more than I can do to explain how we went from sticker to glitter to painting.  I will try to do a step by step show and tell for you later this month.  The entire circle is dusted with Warm Diamond Microfine Glitter and painted over with Copic markers.  There are two browns, a red and an orange on the owl's body.  Use nice quick strokes and don't keep going over it.  Easy to do.  I loved seeing the color shine with the glitter from behind.  Some shimmer sheets were used for the leaf die-cuts.  And don't you love the burnished background?  I had to purchase that embossing folder, Spring Leaves.  I love it.  The Shimmer Sheetz used in the embossing folders are the Bronze Metalic in color. They certainly have that "WOW" effect.  See that glittery strip of paper under the embossed strip at the bottom of the card?  A Saffron Microfine Glitter was adhered to a white piece of paper and burnished until it shined.  You rub it in circular motions and it shines right up.

Close-up of the colors in the owl and the shimmer

My second card today shows some examples of the shimmer sheetz run through different folders and then rubbed with a soft block to remove some of the color where the panel was embossed.  The image is also a sticker.  I really like her.  Her arms are supposed to be bare, but I liked having the color on what I consider her sleeves.  Your preference.  I had such fun coloring her, again over the Warm Diamond Microfine Glitter.


 Close-up of the sparkly girl
I just had to show you at least two of my cards from Saturday.  I had a great time and Els is a great teacher.  Don't pass up any opportunity to take a class.  You won't regret it.


Sunday, June 1, 2014

Strike Me Cheery

for the new challenge and our sponsor Hero Arts.  

Here's my card for opening day, well, unless I make something else I like better.   Loving how water coloring is the rage now.  
Pink, Purple (sentiment), yellow, orange

The one thing you can't see is the sparkle.  The card base is shimmering with Sparkle Sheer Shimmer Spritz while the watercolor panel shimmers with a homemade mist of Perfect Pearls in a Tim Holtz mister bottle.  You have to love those mister bottles - honestly the best!

I used a new Hero Arts clear set Hello Flower, CL774 with the matching die set, Blossom Cuts (DI096) from the Starry Nights catalog.  I had water colored an entire page of water color paper and just die-cut the flower.  That's Stickles around the flower center.

Here's how I put together the background.  I bought a cheap children's set of water colors (couldn't find anything else at the time) for the online watercolor class I took beginning May 5th.  The background was colored on watercolor paper in yellow and red, making orange and pink in the process.  Leaving the card wet so the water colors would puddle in the holes of my Dreamweaver stencil Triangle Weave.  I put a weight on the stencil while the water colors dried and created the unique background.  I took a Distress Ink pad in Dusty Concord and rubbed it all over a piece of watercolor paper and die cut  it using a Memory Box die "cheers" script.

I really like the cheery colors and of course, I love Hero Arts products.  The matching dies with this set are a fantastic time saver.

Hope you like the card.


Saturday, May 31, 2014

Thank you to A Day for Daisies


This is my Thank you card sent virtually to A Day for Daisies for their sponsorship on the Die Cut Divas's blog here. 


I so enjoyed all the delightful images I've been using all month long, such as the surreal image here.  A beauty of the depths?  The shapes for this card just leapt into my hands to be cut.

May your scissors be sharp, but not your heart.

Recipe:
Water World - A Day for Daisies digital stamp
Spellbinders Label 8, I think the Classic Scalloped Squares and I have no idea of the name for the light blue panel.
Blue tear drop gem for her ear ring

Thursday, May 29, 2014

The CCC Reveal

I play in the CCC exchange over at the Society of Stampaholics where we exchange cards with card makers around the world.  Deborah makes it easy for us with so many themes to choose from.  This time, I sent my card to Dawn from the Die Cut Divas, YES!

Dawn received her card a couple days ago, so I can reveal the card I sent.  I chose a Day for Daisies image as I have fallen in love with them this month.  I kept coloring and of course had to use them for cards.

A cl;ose-up.  
Recipe:
A Day for Daisies image - Hepburn
Hero Arts Lattice - I don't see the wood block anymore, but HA still has it in a cling stamp
Window Die
Red gems - tiny red and a red heart
Copic markers
Worn Lipstick Distress ink

I hope Dawn likes her.  I know this is a super girly card, but I couldn't help it.  Happy Days.