Monday, June 30, 2014

It really does look NEON!

A very big "Thank You" goes out to Hero Arts.  I love the new die and stamp coordinations.  I did NOT color in the lines on the flower or butterfly.   I know... what's become of me.  I was moving color outside the lines, inside the lines and everywhere.  You can ask the people at my LSS, The Stamp Art Shoppe.  I go every 3rd Tuesday of the month to color with other Copic marker enthusiasts.  I added white dots to the flower and butterfly, hard to see here, but quite nice.  The card is NOT green;, it's yellow.  I know, hard to see here.  But YELLOW, it is.
I hope you continue to enjoy Hero Arts stamps and find them fun and easy to use.

Recipe:
Hero Arts Blossom Cuts (flower stem) DI096 
Hero Arts Flower and Butterfly Frame Cut DI090
Hero Arts Butterfly and Flower CL750
Hero Arts You're a Rainbow (sentiment) CL765
Pearls
Cuttlebug

Saturday, June 28, 2014

June CCC - - So Much Fun!

The CCC card I made for the June challenge posted here by Deborah Nolan was made from the sweet sketch that Deborah provided as one of the ways to meet her challenge.  I loved the sketch and decided to go with it.  

A simple Hero Arts flower is my focal point colored with Copic markers sits on a striped paper background.  The bottom zig-zag strip of paper is made using a Spellbinders' Edgeabilities die from Classic Petal.  Just cut it twice. The bright flower just reminds me so much of summer.

Recipe:
Hero Arts Butterfly and Flowers(CL750)
Hero Arts Enjoy Today (CL759) - sentiment
Hero Arts Flower and Butterfly Set - Frame Cuts DI090
Spellbinders' Edgeabilities die from Classic Petal.
Kraft cardstock
Copic markers

Friday, June 27, 2014

Copics on White Embossing

Another card with Copic Coloring on White Embossing.  Aren't the colors vivid and bright?  It takes certain stamps to bring out this technique.  I don't know what the brand or name of this stamp is, but it can be beautiful painted with copies on the white embossed stamp.  Using black as the background makes your effort stunning.   My LSS had a class on coloring on white embossing and this is my second card.  You have to find the right stamp for coverage.

Technique Pointer:  Be sure your image is totally embossed so you can color on top of it.  I love the leaves and the flower is much richer in real life.  Let your layers dry some before going on, but you'll still be moving paint around because there is nowhere the paint is going to soak in on an embossed image.

Try embossing black paper with white embossing powder.  I think this was that wonderful Hero Arts Unicorn pigment ink.

Put another technique in your arsenal. 

Wednesday, June 25, 2014

Sitting on a Bench

I got a new die and thought I'd try it out.  Yes, those are new dies on the front of the card too.  I kept the front simple and white.  I thought it fitting for an anniversary card.


I think the inside is marvelous, if I don't say so myself.  The Garden Bench is fun to make and you can check out the Karen Burniston video on YouTube to see exactly how to set up this bench.  I did.  A little help goes a long way.


A Close-up of the bench woven with a branch on the back and the Hero Arts Lattice stamped in Silver.

Recipe:
Hero Arts wood block stamp - Happy Anniversary (very old stamp)
Hero Arts wood block stamp - Lattice (I don't see it on the website, but there is a cling stamp called Lattice          Background that looks much like this one - 331065
Hero Arts A Little - CL758 - (Love sentiment)
Light blue note card folded inside out
Elizabeth Crafts die - Garden Bench
Impression Obsession die -  (DIE161-N) - bird on a branch in the card
Spellbinders Nestabilities Radiant Rectangles used on front and inside with Love stamped on it
Copic Markers

The Lattice is stamped on the blue note card centered in the middle.  I folded it so the pattern showed through the bench.   I die cut the branch on which the bird is sitting one more time so I could add depth in back of the bench and bring the branch lower as well as taking from the back of the bench across the bench back.

I really like how this turned out and hope you do too.

Monday, June 23, 2014

A Little SMILE

A Little Smile Makes Everything Better.  That's what the sign in the spotlight says. I've been trying out my new dies for easel cards.  I just think they're too cute.  I've been hoarding this vintage street lamp die-cut from Dawn, but I have to use it now, else what would light up the sign.  There are always birds hunting for food around the ground under the street lamps.  That's what I think anyway.

The denim color background is great for a guy card and I've had a pack of card stock with an Asian motif to it for years.  Since the front of the stack is gone, I have no idea what stack this lovely paper is from.  I did have fun putting this together.

Card popped up in the easel position
There really is something about these papers that I just love, so I'm quite satisfied with this card.
Recipe:
Hero Arts A Little (CL758)
Elizabeth Crafts die-cut (Stand up Helpers) - guess what they do (yep, they help things stand up)
Distress ink Faded Jeans
Memento ink Tuxedo Black
Die-cut street lamp - unknown maker

Saturday, June 21, 2014

A FINISHED PROJECT!

FINISHED this morning!  My LSS, The Stamp Art Shoppe in Roseville, California, USA is hosting a contest and I usually don't do anything other than cards, but this time I wanted to do something more.

The contest must have a Julie Nutting doll.  This is like paper dolls for adults.  I had die-cut the doll and dress,then found some deep blue ribbon (almost black, it's so blue) that would make for a silky frock for the dear to wear.  The ribbon is pleated and about 11/2 inches wide.  I wrapped it around the doll until she had most of a dress on her.  I took Black Soot Distress Stickles and stickled the top of her black dress.quite heavily.  WOW... you can't see the glitter here, but it's quite amazingly glittery I gave her long hair plus bangs from the stamp and die set, "Halie".  Since I have more than one doll, I stole the hat and boots from another doll named "Priscilla".  Don't worry about Priscilla.  I can make her another set of boots.

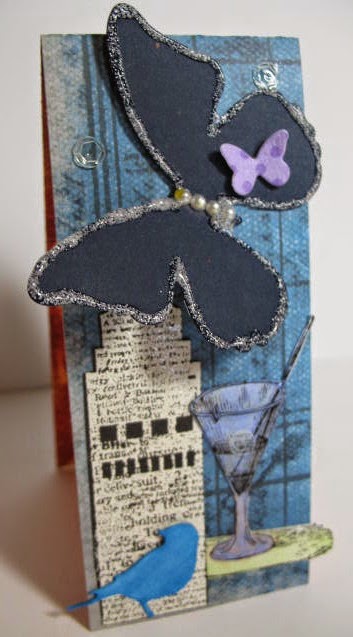
I found the black chalk board at Michaels.  It's not only a black board, but the other side is a white board about 11 inches tall & 7 or 8 inches wide.  The two boards are held together at the bottom by about 6 inches of cording. I saw this and had my project thought out.  The beautiful flowers are from Hero Arts and the butterflies are from the new Hero Arts Butterfly die. Lots of fun putting this together.


Recipe:
Hero Arts Butterfly - DI078  (yellow butterfly from almost a buttercup yellow thick glitter paper, all      other butterflies are recycled from tissue boxes)
Hero Arts Blossom Cuts DI096
Hero Arts Hello Flowers CL774
Julie Nutting A4 Buff Paper Pad - page used for doll's body
Julie Nutting Tag Pad Hancock Park (tag)
Open weave 5 inch wide ribbons (Hobby Lobby in their fabric section)
Chalk Board stands upright and all materials held on by glue dots.


Friday, June 20, 2014

Girl with a Gift

I had these little girls colored and ready for a card so I had to find them homes.  Bright and sassy this gal makes a fun card for a kid with that striped background. 


 Close-up

I guess I had to try another easel card, this time with this lovely Hero Art girl from a couple years ago.  She's just so precious that I had to color her and show her off.  Since I folded the card so well, i have to keep a finder on the front so it doesn't pop up.    I hope you enjoy this little girl too. This would be great to just see how someone was doing or to say, hey, sorry I missed your birthday.


Close-up of easel card.
The left photo shows this easel card closed.  I like the denim blue background on the paper.  Fun cards to make. 

Recipe:
Hero Arts Girl with Gift G5331 - looks like it's retired
Elizabeth Dies - 797 - Flourish with Flowers
Copic markers
QuicKutz cutting dies -nesting rectangles
QuicKutz cutting dies -nesting circles
Spellbinders Label 8 die
Tim Holtz Distress inks Spiced Marmalade and Wild Honey

Tuesday, June 17, 2014

A cute Operation Write Home (OWH) Easel Card

Well, I think it's cute.  I was having such a difficult time deciding how to color this set that I turned to paper piecing to solve my problems.  It worked for me.  I just colored in the eyes with a white gel pen.  A little flourish here and then and I have a cute OWH easel card.


See that holder sticking up?  That's an Elizabeth Crafts Design die from the set Stand Up Helpers.  Cute name and there are 6 dies.

Hero Arts OWH Lil Hoot CL755
Lots of patterned paper
Elizabeth Crafts Design die from the set Stand Up Helpers
Impression Obsession butterfly (four little butterflies set)

Sunday, June 15, 2014

Mod Town California

 This reminds me of a modern busy city, sun shining brightly, traffic moving along, buildings rising to touch the sky.  The hot sun seems to be burning hot, beaming down on this city, heating up the cars to sweltering temperatures, just like here in Sacramento area last week, 106 degrees Fahrenheit.  It took me awhile to put this together because I water colored the background, then i waited until some kind of illumination might hit me so I could continue to build this card.  I never saw any light except this sun, so I just kept adding something day by day and the card turned out better than I thought it would.


Recipe:
Hero Arts Operation Write Home (OWH) You're a Rainbow CL765 (sun)
Hero Arts OWH What a Guy *CL753
Lots of die-cuts
Cars cut on Cuttlebug out of a Coke can  (Yes, I do recycle.)
Distress paint tarnished brass


Friday, June 13, 2014

Dad's Day in the US

The Big Day is coming up for DADS in the U.S.

Happy Father's Day to all the dads.  I'm wishing my son a great big Father's Day with the Hero Arts wood block stamp from 1994 when they used to date their stamps.  Now I'm DATED.   Since my son's a teacher, he also receives an apple for his work.    I think the Denim type card stock lends itself well to a card for guys. Here's the card as you would see it when first pulled out of the envelope.

Here you see it sitting upright as a panel on an easel.
The "for you" is not smudged, it is the patterned back of the dotted paper.

Close-up of the sentiment & apple

Recipe:
Hero Arts Wood Block stamp - Happy Father's Day
Die cuts from Little B - (for, you, and congrats)
Die Cuts from L cutting dies - circles
Die cut from Elizabeth Dies - tab for holding the easel panel upright
Apple stamp out of a Michael's bin - distributed by Greenbrier International Inc. stamped on water color paper & colored with Distress inks - this was colored months ago, possibly with Shabby Shutters and Warn Lipstick or Spiced Marmalade.

Wednesday, June 11, 2014

Coloring with Copics on White Embossing

Here's something new I learned at my local stamp shop, The Stamp Art Shoppe the beginning of June.  I colored several stamped images in class and then made cards at home.  My other images were trial runs, but the card below, I'm quite satisfied with.  You need mostly a solid surface for the embossing powder to stick to and then color.  .I think this flower might be a Penny Black stamp, whatever it is, I love this.  I could color this all day!  This flower turned out fantastic. 
 I hope you try coloring on a white embossed image with your Copic markers to see what you can do.  Because the ink won't soak into the paper and just sits on the top of the embossed image, you will be moving the ink around on top of the embossing.  You may need to give this some seconds to dry, but you won't see the subtle blending normal to Copics.

Sunday, June 8, 2014

Easel is Easy

One last card to show you from my May 31st classes with Elizabeth from Elizabeth Crafts.  I really haven't done many easel cards, I can count them on one hand.  Shimmer Sheetz are quite beautiful.  The bottom sold butterfly is made with a shimmer sheet as well as the body on top of the 2nd butterfly.  I'm not sure if one sheet is a sheet or still a sheetz.

Here's a little trick on this card.  Do you see the pink top half of a flower below the butterfly keeping the upright panel from moving?  Well, it's a die-cut from Elizabeth Crafts.  The 6 dies are small, but you don't have to worry about making sure your panel doesn't slip when in the upright position.  Take a look and you might want your panel help upright by a heart, candles or leaves, just to name three.

I've already cut paper for 6 more easel cards.  I guess I love to die-cut, just like a Die Cut Diva.

Close-up of the butterfly & Shimmer Sheet.

Take care and have fun.

Saturday, June 7, 2014

Flowers and Butterflies, All Aglitter

Back to show you a couple more cards I made on May 31st with a great teacher Elizabeth from Elizabeth Crafts.  We were all hustling and bustling.  Copic markers are fabulous on this Silk Microfine glitter.  Take a look at this great YouTube video with Els showing how to take the sticker from beginning to end.  She explains it so easily and you can see what she is doing, which helps a lot.  I won't be trying to photograph putting a card together because the video is fantastic.

If you didn't know before, the black outline is a sticker.  I believe this is the Accordion Fancy Die at Elizabeth Crafts.  The center panel is on acetate, the pink panel on the inside and the colored flower on the outside.  The small sections that would hold the panels together have been snipped so you can give this die another look.

Close-up of the glittery image.  I loved coloring this.  It just adds another dimension.

Tri-fold card.  This is the front panel.  Just don't keep coloring.  Make nice sweeps of your Copic marker and then leave it alone.  You can use your Copic blender or you can use another color to blend in.  Just don't keep coloring.  

Inside of the tri-fold.  Even the colorful borders (Fancy Framed Edges) are dies 
that match the accordion dies.  

Folding this card was a challenge for me.  I don't know a valley from a mountain.  

You can see I finally found my valleys and mountains.  I really do like this card.

Friday, June 6, 2014

It's time for a scrapling!

SECOND POST TODAY!  First post was VERY early and this post is going live at 9:00 p.m.

When I saw Virginia's post for a scrapling challenge, I knew I had to make one, it's been too long.  Meet me at Virginia's View Challenge for a stroll down Scrapling Lane at the corner of Tag Court.  You'll have to bring a piece or two of junk or something that might be thrown out too.

I was cutting easel cards out of a 12 inch X 12 inch card stock (that great denim blue background).  The leftover is cut approximately 1 1/2 x 4 1/4 inches.  I found a number of things in my plastic bag under my table (yes, into this bag go things I can't use right away, but that may be used).  I only colored the bird and the drink images.  The drink has some Glossy Accents dabbed where the drink is filled.  I rather like this - I think its the colors.

Hero Arts Skyline - one of the buildings cut out K5736
Hero Arts Digital image from Digital Design Kit "The Art of Style" - drink
Memory Box Darla Butterfly pulled out of package
Small Impression Obsession butterfly still on table
Memory Box Gold Finch die cut still on table

DT Roll Call over at Die Cut DIvas

There's a DT Roll call at Die Cut Divas and all the information is on this post.  We'd love to share some of your work with all the Divas out there.  Please stop in and consider sending the Die Cut Divas an email over on the Die Cut Divas' blog.

Thursday, June 5, 2014

A Crocus for You

Only one card today.  I didn't want to overwhelm you.  It's a card from my classes on May 31st with Els of Elizabeth Crafts.  We had all seats filled at The Stamp Art Shoppe and everyone was excited and busy.  I don't want to bore you with information, but the crocuses are painted with Copic markers over Elizabeth Crafts Microfine Glitter in Warm Diamond.  This is another great die too.

I found a great YouTube video with El's showing how to take the sticker from beginning to end.  She explains it so easily and you can see what she is doing, which helps a lot.  I won't be trying to photograph putting a card together because the video is fantastic.  .


Close-up of the front of the card.

This card is pushed back together so you can see the images better.

This is the inside the way it is meant to be opened.

The panel is easier to see in the close-up with it in the position it is die-cut in.

You can use this die-cut with any size card. It is easy to work with.  Even I could figure it out.

Monday, June 2, 2014

Elizabeth Crafts - I MET the REAL Els

On May 31st, I was lucky enough to take two classes from Els of Elizabeth Crafts.  She's just as charming and full of information and tips as you see on YouTube.  Oh my goodness, what you learn in one of her classes is incredible, well worth the effort to sign up for a class and attend.
This little owl is a sticker.  It would take more than I can do to explain how we went from sticker to glitter to painting.  I will try to do a step by step show and tell for you later this month.  The entire circle is dusted with Warm Diamond Microfine Glitter and painted over with Copic markers.  There are two browns, a red and an orange on the owl's body.  Use nice quick strokes and don't keep going over it.  Easy to do.  I loved seeing the color shine with the glitter from behind.  Some shimmer sheets were used for the leaf die-cuts.  And don't you love the burnished background?  I had to purchase that embossing folder, Spring Leaves.  I love it.  The Shimmer Sheetz used in the embossing folders are the Bronze Metalic in color. They certainly have that "WOW" effect.  See that glittery strip of paper under the embossed strip at the bottom of the card?  A Saffron Microfine Glitter was adhered to a white piece of paper and burnished until it shined.  You rub it in circular motions and it shines right up.

Close-up of the colors in the owl and the shimmer

My second card today shows some examples of the shimmer sheetz run through different folders and then rubbed with a soft block to remove some of the color where the panel was embossed.  The image is also a sticker.  I really like her.  Her arms are supposed to be bare, but I liked having the color on what I consider her sleeves.  Your preference.  I had such fun coloring her, again over the Warm Diamond Microfine Glitter.


 Close-up of the sparkly girl
I just had to show you at least two of my cards from Saturday.  I had a great time and Els is a great teacher.  Don't pass up any opportunity to take a class.  You won't regret it.


Sunday, June 1, 2014

Strike Me Cheery

for the new challenge and our sponsor Hero Arts.  

Here's my card for opening day, well, unless I make something else I like better.   Loving how water coloring is the rage now.  
Pink, Purple (sentiment), yellow, orange

The one thing you can't see is the sparkle.  The card base is shimmering with Sparkle Sheer Shimmer Spritz while the watercolor panel shimmers with a homemade mist of Perfect Pearls in a Tim Holtz mister bottle.  You have to love those mister bottles - honestly the best!

I used a new Hero Arts clear set Hello Flower, CL774 with the matching die set, Blossom Cuts (DI096) from the Starry Nights catalog.  I had water colored an entire page of water color paper and just die-cut the flower.  That's Stickles around the flower center.

Here's how I put together the background.  I bought a cheap children's set of water colors (couldn't find anything else at the time) for the online watercolor class I took beginning May 5th.  The background was colored on watercolor paper in yellow and red, making orange and pink in the process.  Leaving the card wet so the water colors would puddle in the holes of my Dreamweaver stencil Triangle Weave.  I put a weight on the stencil while the water colors dried and created the unique background.  I took a Distress Ink pad in Dusty Concord and rubbed it all over a piece of watercolor paper and die cut  it using a Memory Box die "cheers" script.

I really like the cheery colors and of course, I love Hero Arts products.  The matching dies with this set are a fantastic time saver.

Hope you like the card.