Showing posts with label 2014. Show all posts

Wednesday, December 31, 2014

One more December Project


One more item for December:
A small gift of perfume for my daughter-in-law
I chose some silver gift wrap and a stamp by Judi-Kins, Spiral Flower Dots, and stamped it with Hero Arts Unicorn Pigment Ink.  It does not dry fast or maybe much at all and I didn't want to take a heat tool to it as the box contains perfume.  (TIP - stamp before you wrap the present).  So I wiped some of the ink off.  I then die-cut the fabulous Elizabeth Craft Designs snowflakes and attached with Mono Multi Liquid Glue - just a few dots.  I love these snowflakes and this is the first time I've used them.  I cut the snowflakes out of  white glitter paper.  Simple, but a bit elegant too.


Close up of the snowflakes.   

Be sure to visit Die Cut Divas.  


Friday, December 26, 2014

A Penguin Holly Jolly Tag

Gift card Tag made for one of my sons.  There's always something that needs a gift card, movies, restaurants, massage, department store, game store or hobby store.  This card will be for one of my sons, as I always get something that seems to require a gift card.


Final measurements are 6 1/4 inches Long and 3 1/2 inches wide.  I cut this about 10 1/2 inches long. I took the bottom piece and cut it with a one of the dies from Elizabeth Craft Designs Agatha Edges. I thought a landscape of trees should give some depth to the card and the penguin would look cute sitting in front of a rolling hill.  I chose a cute sentiment from Hero Arts Holly Jolly set.  I think it fits the feel of the card.  Hope you're not running to catch up on your card making.  I seem to be always making holiday cards.  Since they are so much fun to make, YAY for cards.


Close-up of Chilly the Penguin

Elizabeth Craft Designs Chilly The Penguin
Elizabeth Craft Designs Dies - Tag 1
 Elizabeth Craft Designs Agatha Edges
Memory Box Evergreen Landscape

Be sure to visit Die Cut Divas for the monthly challenge.

Thursday, December 25, 2014

A Merry Christmas to All!

Die R Us is our December sponsor for Die Cut Divas - Die Cut Divas and Dies R Us... Could it get any better?  You don't have to be a kid to play house!

Visit Die Cut Divas for the challenge for December.

My sample below is for the Die Cut Divas.
There's not much decoration on the front, but the inside is the STAR!
Elizabeth Craft Designs - Season's Greetings Stand-Up Helper


What do we have here?  A Winter Scene.  I thought the patterned background was rather a fun paper for a forest scene. I also used a zig-zag pattern on some the the trees and I like how this turned out.

There are all kinds of fun pieces to the Holiday House and I embossed 3 of the main panels with a wood grain.  It felt too large for the house, but I rather like it now with distress ink Vintage Photo sponged on.  I would have picked out the windows, but kept them in for fun.  

A side view to see how I staggered the props (poles & trees behind the house).  

To give everyone an idea of the die-cuts I worked with:
Season's Greetsings Stand Up Helper 940 (front of card)
Evergreen Pivot Card (trees only) 912  (one on front of card &)
Holiday House 918
Lots of Pops Die (779),  (the part that actually holds the house, post and some trees up) see here and there are neat videos on Pinterest http://www.pinterest.com/eCraftDesigns/youtube-by-elizabeth-craft-designs/.  I found this at http://diningroomdrawers.blogspot.co.uk/2014/04/pop-it-ups-new-baby-boy-card.html for the Lots of Pops dies which I think is a die with LOTS of possibilities.   .
Katie Label Pivot Card 768 - used the largest label in that die set to cut the tan mat for writing on.

Hope you like the elements I grouped together.  I had fun playing house.

Wednesday, December 24, 2014

Tick Tock


The time has come for Christmas and I thought the black and gold were fundamentally an elegant combination.  Inlaying the clock with the gold numbers was terrific.  I got two cards out of this clock by inlaying each clock with the opposite color.  I do have to let you know  re-purposed the label from a package of Tim Holtz products.  Love the grain on this label.


Interior of card

Recipe:
Time - Memory Box Classic Upper Case Alphabet
Elizabeth Craft Designs Clock and Gears (917)
Spellbinders Labels 18

Be sure to visit Die Cut Divas for the challenge for December.

Thursday, December 18, 2014

My Notebook


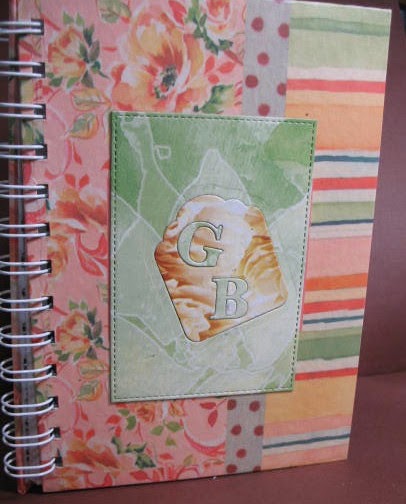
I posted a bunch of notebooks on December 12th that I made for my friends at work.  Now I'm posting the notebook I made for myself.  I probably bought this book over 3 years ago.  I just didn't have any idea about how I wanted to personalize the book.  Recently I purchased several of the stitched dies and fell in love with them.  That's when the idea hit me.  I also received some type of ad on a museum that had some fantastic photos and odds and ends of focal pieces.  I used those pieces to made my panel.  I wish I had photographed that ad because there is nothing left of it.  However, the letters were made from a Cuttlebug panel which is shown below my book photos.
The outside of my notebook below

I wanted you to see more clearly the design on the black panel and the stitched effect on all square panels.  I love the technique of inlaying letters and patterns into another panel.

This is the back of my notebook.  I had a couple things left over from die-cutting so I put them on the back.  Something a bit different, but I like it.
 Memory Box Classic Upper Alphabet
Die-namics Stitched Stax (squares))

Cuttlebug packaging below

I had a lot of fun making notebooks this year.  If you find them for $1.00 at Michaels like I did, it's certainly worth personalizing and taking the time out of making them your own.  If you're making something more unique, of course, then make it from scratch.

Arlene


Monday, December 15, 2014

Personalizing Christmas Patterned Note Cards

I see we have an interview over at Die Cut Divas.  Be sure to check it out here.

Christmas patterned note cards make it easy to decorate and add a personal touch.  There are four of each Christmas patterns, so I used one note cards to cut out Seasons's Greetings (Elizabeth Crafts Designs) and the holly leaves (Memory Box).  I know it's not much, but I couldn't find anything to add besides sentiments and holly leaves and a few gems.  I'm getting my Xmas cards done.  I haven't used this wonderful die-cut much and just had to use it on these three cards - Memory Box Country Landscape.

Memory Box Country Landscape at Dies R Us
Elizabeth Crafts Designs Season's Greetings at Dies R Us


You can still keep your cards personal by adding a different color, sentiment or placement of a die-cut.  Keep it fun.

I had stamped this Hero Arts sentiment and holly a year ago and just finished the card now.

Elizabeth Craft Designs Best Wishes
This card is from a different set of 4 cards.  We'll see if I use the rest of them up.

You can bring ordinary cards the personal touch and texture with die-cuts.  I love the way patterned papers give a bit of pizzazz to a card.

Remember that the Die Cut Divas' is having a challenge.  Join the fun!

Friday, December 12, 2014

Notebooks or Journals, Use Them


I gave these away at the beginning of December  I was happy with the way the books turned out.  I really don't know what to call them because the two women I gave these to  may use them for different things.

SURPRISE:  The die-cut panels and letters are all cut from ordinary TISSUE BOXES!   Because people save me tissue boxes at work, I figure they would like to see what I do with them.  They are always surprised.  They now know that many of my tags are made from their tissue boxes, but this is the first time I've done notebooks for them.

SURPRISE:  I did NOT make the books.  I had been collecting notebooks a few at a time over the past several year and finally had enough to give away 16 books.  I have several other books to show you later this month.  Not always did the store I purchased these have enough to make 16 of any one kind.

I am really pleased with how these turned out and I hope you like the way these turned out.
  This really is such a lovely book.  I bought the two books at one of the dollar stores around town.

This is the front and back of Ginnie's book

This is the front of the book using a small tag embedded in the stitched frame.  The letters were embedded in the tag.  I love this technique now.  

I only had one panel of this marvelous flower arrangement or I would have made both tags the same.  I'm now very picky about the tissue boxes I buy - HOW WILL I USE THIS ONCE IT'S EMPTY???  LOL
Die-namics Stitched Stax (rectangles)
Hero Arts Long and Cute Tags  (DI046)

Books I made for the guys at work!

 
This one's for Ed - I loved the angles.

Don't you just love the modern architecture on this for Michael?


The gray and black blocking does it for me.  Richard is sure to use it.

For more of the gals in my office

I loved the colors in the round panel.

What a gorgeous panel - who would think tissue box?


I love how this book came together. 

I hope you liked these and just because you don't make the entire book doesn't mean you can't put your own unique style into your gifts.
Tuesday, December 9, 2014

A Little Goes a Long Way - Season's Greetings

I let  Xmas printed note cards give me a head start on cards. There are four of each Xmas patterns, so I used one of the other note cards to cut out Seasons's Greetings (Elizabeth Crafts Designs) and the holly leaves (Memory Box).  I know it's not much, but I couldn't find anything to add besides a sentiments and holly leaves.  I'm fine with only adding a little.  Sometimes LESS is MORE..

BEFORE PHOTO

AFTER PHOTO

I know there's not much difference, but a little bit was all it needed to make a more personal card for the holidays.

Recipe:
Elizabeth Crafting Designs Seasons's Greetings
Memory Box Mini Holly Leaves

Wednesday, December 3, 2014

Trucks and Trees

I never went up to the Sierras to cut a tree, but I know many people love to go and cut their own tree.  I thought this truck could bring home the tree.  Using a Christmas patterned note card makes it easy when it comes to a background.  I had such fun with this truck.  You can see my cards are not quite making themselves, but well on the way.

Hero Arts embellishment - tree on the left side


I used a Impression Obsession die Classic Truck from Dies R Us here.      

These were super fun to put together. 

I can see using this truck for those old fashioned cards.  

Elizabeth Crafts Designs Noel
Elizabeth Crafts Designs - Evergreen Pivot Card - tree 
Impression Obsession (IO) die  - truck
Xmas note cards bought at Hobby Lobby a couple years ago

Monday, December 1, 2014

December 1st has Magically Appeared

December 1st has magically appeared, or so it seems to me.  How does it roll around so quickly? Dates seem to do that.  I thought I'd have some fun with the holidays and dress my owl in stripes, stripes you say?   Yep, not just any stripes either, these are re-purposed stripes from (WAIT FOR IT) a tissue box.  I have been creating some tags using tissue boxes as the source of my materials, which I will share with you at a later date, but not now.

I think this owl looks charming or maybe "goofy", but I think he's rather cute.  I also want to let you know this card is my CCC entry to send to Helen.  You'll want to see all the cards sent around the world on the Society of Stampaholics.  I used Debbie Nolan's sketch and it was easy peasy to put this card together.

I used a Hero Arts stamp inside and forgot to take a photo before I sent it off, but the sentiment is " Crafty Friends are the Best of Friends"

Recipe:
Elizabeth Craft Designs Poppy The Owl
Elizabeth Craft Designs Prig with Berries
Memory Box Patisserie Labels
Hero Arts Crafty Friends H5943
The Paper Studio Everyday Expressions - (celebrate)
Maroon Note Card
Checkered Red and White card stock
Stickles

Sunday, November 30, 2014

Second Post of the Day - Tags

I had cut the Bugaboo Presents out and they were still on my desk as was the scrap of dark chocolate file folder.  I made a tag.  This will go on one of my Christmas presents and the USPS truck just dropped one of my packages off and I'm in the midst of wrapping it.  So have a wonderful season.


Close-up
Bugaboo Stamps presents
Elizabeth Crafts Design Tags and More 1

A Couple of Fairies

Once upon a time, there was a fairy and her name was Fairy Christmas from the land of Bugaboo.  She only came to life when she was painted and it didn't matter what colors she might wear, she always looked excited and sweet.

I'd like to share the fairy that made my month, Fairy Christmas!


I used a new die-cut here, all the bubbles and dots are part of the Memory Box Loopy Rings die.
I think if I titled the card below anything, this would be Fairy Bubbles.  I was having fun with a new Die and went bubble happy.  I just love coloring this particular image and hope you had a great month.

I have thoroughly enjoyed this month's treasures.  Visit Die Cut Divas for our last day of the challenge sponsored by Bugaboo.

Thursday, November 27, 2014

Happy Thanksgiving to All

I can't help myself.  I love the little Bugaboo Sun Bonnet (SB) gals and this one is no different.  Want some turkey direct from the oven?   Here it comes!

I love the deep colors and I can almost smell the turkey roasting at this point.  A real winner for me.  I really love the greens - Copics YR 61, YR 63 and YR 67.

Recipe:
Bugaboo Digital Stamp - Fancy SB Thanksgiving
Hero Arts CL My Words CL695 
Hero Arts Dots and Flowers S5213
Sizzix Stamp/Die set 658296
Gold embellishments
Copic markers
Distress inks Mustard Seed and Wild Honey background inks on die-cut panels
QuicKutz circle die-cuts

Sunday, November 23, 2014

Tags for the Holidays

I colored these Bugaboo images and then didn't know what I wanted to do with them. I thought round and went from there.  I made one tag with the Lacy die-cut as a backing to the blue folder from which I die-cut the round ornament.

I found some wonderful blue patterned papers and die cut the ornaments from those papers.  I like the way they turned out.  They'll go on my presents to my family for Christmas.


I'm entering these tags in:TAG - YOU'RE IT!
and GLITTER AND SPARKLE

I'm off to Apple Hill tomorrow for some fresh baked apple pie!

Friday, November 21, 2014

Time to Check Those Ornaments!

Tis the time to work on your holiday cards.  I'm sure you must know I love, love, love the Bugaboo Sun Bonnet (SB) gals.  I think she's being pretty careful with that ornament.  You can find her here.
I colored her with Copic markers, using my markers on the side panels also.  This is my sample card for the November Challenge.  Go check Die Cut Divas out.

Front of card

See how the card opens

Inside of card when opened.  
I saved some space to write a little something under the Season's Greetings.

Seen from the back of the card - yes I decorated the back too with a cute Bugaboo stamp (Winter Circle Sentiments - Jingle Bells).
I love the bells on the back as they make a beautiful backing without much work.  A little bit of coloring and a circle die-cut and it's done.

Recipe:
Elizabeth Craft Designs dies (Square with Circle Frame Edges, Accordion Circle Card)
Copic Markers on all edges, including the frame with holes on the interior of the card)  
Lifestyle QuicKutz nesting circle dies purchased at my LSS, The Stamp Art Shoppe

Thursday, November 20, 2014

Owl'll Wish You a Merry Christmas!

I had to dress Poppy up in a patterned paper, just had to.  I turned the Delicate branch frame upside down so Poppy could sit relaxed and happy.  I hear him whistling a merry tune right now.   I wondered how this would work upside down, but I think it actually looks like it was made for dear Poppy, don't you?

I used a patterned note card that had a white die-cut like center and I knew the branch frame would not fit the note card framing, but thought I'd give it a go and I think it works.  It's not too far from the outline and the focal point (yes, it is the owl) draws the eye past any discrepancies in matching the die-cut with the imprinted card base.  HAPPY DAYS!

Hope you like Poppy.  He's totally fun to work with.


Close-up of Poppy with his BIG EYES made out of black gems. 

Recipe:
Delicate Branch Frame (turned upside down)
Elizabeth Craft Designs Poppy The Owl
2 large black gems for the eyes
Xmas patterned note card as a base


Saturday, November 15, 2014

Took a Class,Made a Village


Aren't these cute?  I took a class and had some fun making a holiday village.  I think the trees are a nice touch.  We even went so far as to sparkle the trees!  Don't you like the finishing touch of putting a bell into the top window on the left, like a belfry?  I love the papers and all the wonderful embellishments.

I'm entering this in A2Z Scrapbooking Supplies challenge which is anything goes!

 We used a brown paper tape that seemed more heavy duty than just tape.

I really like this, such a happy pattern and village.
Tim Holtz Artful Dwellings (Sizzix)  And yes, you can turn them upside down and make a banner.  Take a look - Tim Holtz Artful Dwellings