Sunday, February 22, 2009

Swirls and circles 02-16-09

Angelina (9 years old) stamped almost two full sets of Inkadinkadoo stamps I received from a give-away at Gaal Creative, Anne Gaal's blog. Angelina and I spend quite some time stamping together. She takes her art seriously. She loves to color. I'm sure most of us stampers never left coloring behind. I wanted to showpiece her two newest stamping sessions here.

Angelina's Swirls 02-16-09

Wednesday, February 18, 2009

Stamping Cafe

Is this a coffee place where you can stamp too?????? Nah, it's a fellow Hero Arts artist whose card today just struck me as so dramatic and rich, I just had to write about it.

Stamping Cafe always has such wonderful cards, but you must hop over to see this card. I'm not sure that it's any one thing that draws me to her card. I loved the cardstock colors right off the bat, the design was great, the sentiment spoke volumes and the embellishments were perfect.

Let's toast to Kiara Lee for creating a work of art!

Sunday, February 15, 2009

Challenge for Caardvarks

Dress Feb 15
Dress Feb 15,
originally uploaded by Clarian's Hawk * Arlene.
I had colored and cut the dress from the Hero Arts stamp set "Glamorous, sku CL297" but never used it. I wanted to enter the Caardvarks challenge using hearts as the theme for the week, but really wanted to do a little something with this dress. I stamped the background, but wasn't happy with the stamp I intended to use... so dump that... I used red stickles on some of the centers of the flowers on the dress to "dress" it up. I used the Cuttlebug to die-cut the heart... love the little bug.

One more thing, I should never do something when I'm half asleep - forgot I had to tie Mr. Linky to my blog. I know I'll get this straight soon -Third time's the charm, they say.

Thursday, February 12, 2009

Stampersuzz's ATC

This ATC is so beautiful. The letters stand out and you find you want to touch them... I'm a touchy feely person...

The lady, flowers, lace and letters are adhered to clear acetate that has also been stamped with a script stamp - looks like that to me. Then there is a lovely softly colored pattern paper under the acetate.

All in all, a real gem and lots of detail and time in the making. Thank you so much for this card. See Stampersuzz on Flickr and her blog for her marvelous cards.

Feb Asian Round card 2009

There's a Cuttlebug Challenge at Cubblebugchallenge.blogspot.com and I thought of the wonderful scallop pocket card which was featured on "Watch it Wednesdays" at Hero Arts dated January 14, 2009. Fantastic little video gives all the 'How to" and this is so easy to do.

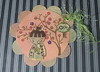
I used the Nestabilities Circles in my Cuttlebug (nice little bug) and cut cardstock 3 times - the other two are white and I used some wonderful papers from DCWV "The Far East Mat Stack" for the top of the stack. It's so easy if you watch the video just once.

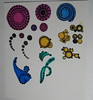
DIe-cut all three circles at the same time
Punch out small circles (I used 10)
Decorate the top circle as you wish
Adhere all small circles with removable tape (OK NOW you NEED to go watch the video - look on the right side-bar for "Watch it Wednesdays").

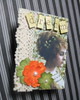
The middle will be cut and all but the slider part will be adhered to the bottom circle Take two of the small circles and adhere to the middle slider permanentlly. Adhear the top circle to the other circle so you can slide your slider in and out. Just watch the video... I put an eyelet in and put some yarn through so the receiver of this card will know she should pull it. This fits so snugly that you would never know there was a hidden pocket.

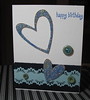
I'm also entering this card in the Hero Arts challenge for this week - our favorite stamps. And the Four Dolls set and Slanted Tree are my favorites for the past month or so. Brand new and wonderful to work with.

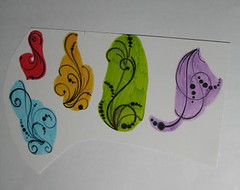
I stamped the lantern, doll and tree in brown ink as part of the Cuttlebug challenge was to use an Asian theme but NO BLACK OR RED allowed. I used a complementary color for my small circles and stamped the lantern, fan and doll out of the same cardstock. There's some variation in color so I could stamp the face in a suitable face color. Some pearls and gems dot the images. The doll is holding the fan.

I am pleased with the results and hope you like them too.

Cuttlebug embossing

I have not yet tried the style of embossing taught on a video at The Cuttlebug Spot. I saw a card on the Hero Arts Flickr group made by turleyfamily. She was so nice to have posted the spot of a video showing how to use the Cuttlebug to obtain a lovely twice embossed card. It's like creating a template, which she did. You can use this over again and again. You really have to see how it's done.

Tuesday, February 3, 2009

Hearts for February

Happy Birthday Feb 2009 What would February be without hearts? I decided to make another card in a non-traditional color, not the reds of Valentine's Day. I found several blue shades in my scrap drawer and had some pre-made blue glittered hearts from a wonderful heart die-cut from my Cuttlebug.

Think simple design and Voila! I wanted a bit of a soft feminine look so I used a border punch (the only one I have) and thought I'd punch both sides. A little Happy Birthday at the top with some buttons and a gem topped it off.

There is still glitter from the hearts on my desk after making several hearts and it's on my face, hands, desk.... everywhere... the only reason I don't use glitter too much. I've been happy with the results, but a little goes a long way.

Sunday, February 1, 2009

Heart Feb 2009

Heart Feb 2009
Heart Feb 2009,
originally uploaded by Clarian's Hawk * Arlene.
When I ran the stiff cardstock through the Cuttlebug, this heart stayed together and the colors were ok, but nothing I thought I'd really use. I had found this pretty soft blue glitter in my glitter drawer (imagine finding it in the right spot) and decided to do a blue heart card. I taped the back of the hearts as this is a three cut die (hearts inside of hearts) and I didn't want it coming apart after I glittered it.

I was really pleased with color. I took a border punch and some ribbon, stamped a message and voila! Simple and pretty. This went so fast (well, after waiting for the glue and glitter to dry on the card).